Settings
Managing the Brands
In the Settings section, operators will find an overview of the brands associated with their Fluid DatoCMS profile. These brands are assigned to them by Fluid and can be managed through this interface.
To begin managing a brand, simply click on the brand name from the list on the initial Settings page.
Name
This is the name assigned to the operator’s Brand in the Fluid DatoCMS project. The name serves as an identifier within the backoffice. It has been set by Fluid and should not be changed.
AI Features
Fluid offers a suite of AI Features to help operators customise deposit journeys for their customers.
Click here to learn more about our AI Features.
Amounts
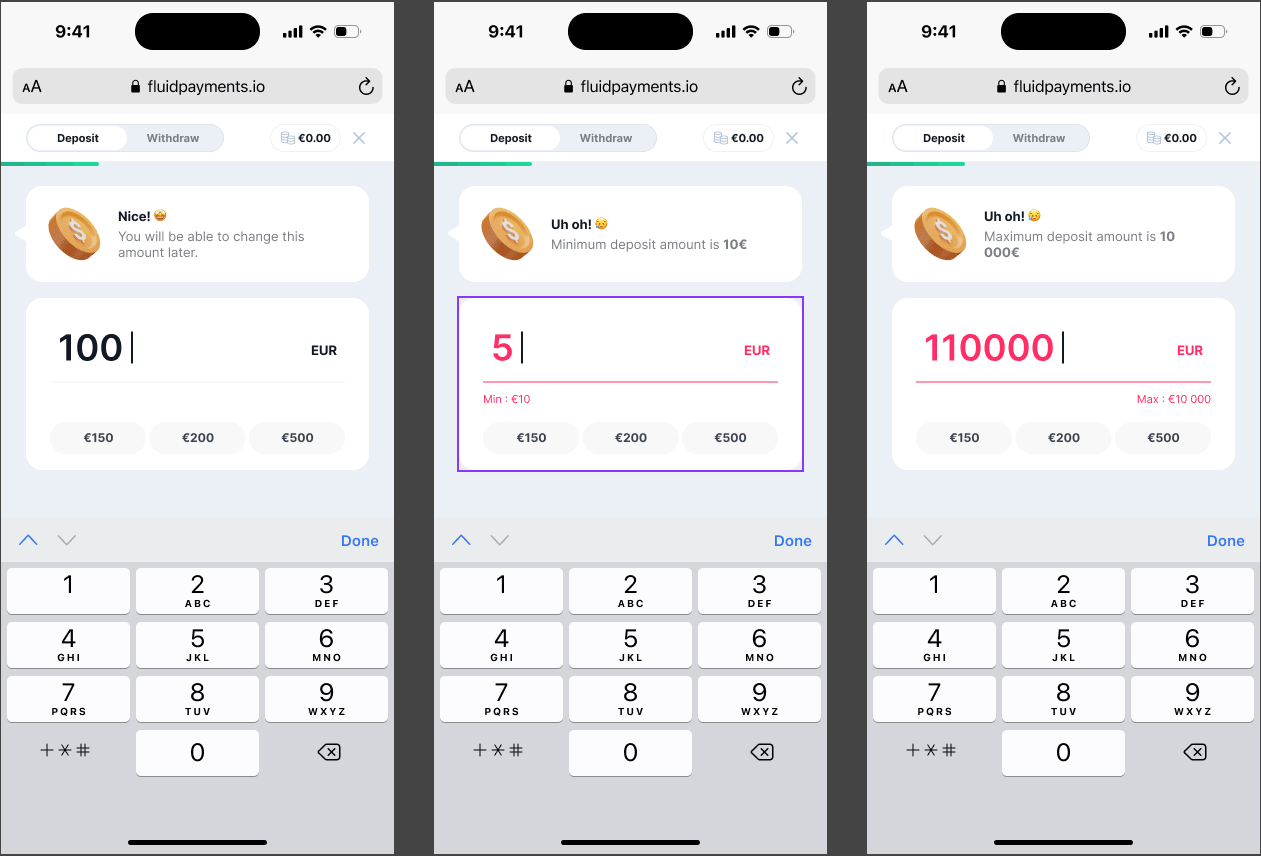
Hide min/max Amount
By default, the wallet shows the min and max limits as helper text directly under the amount input, so customers know the accepted range at a glance. Some operators prefer a cleaner amount step that only surfaces a limit once it actually applies to the customer.
Enabling Hide min/max Amount changes the behavior on the deposit flow to:
- The min and max helper text is hidden on initial load, regardless of the default amount.
- The min value appears only when the customer enters an amount below the minimum.
- The max value appears only when the customer enters an amount above the maximum.
- As soon as the entered amount is back within the accepted range, both helpers are hidden again.
To prevent any layout jump when an error appears, the space beneath the input is reserved even while no helper is shown — the input itself never shifts.
Note: A short delay is applied before an error message appears, so customers don't see a brief red flash while still typing (e.g. typing "200" against a minimum of 20 will not show "below min" while passing through "2" or "20").
Scope: This setting applies to the deposit flow only. The withdrawal flow always shows the min and max limits, so customers know the maximum amount they can take out.
As set in the back office:

As displayed in the wallet when disabled:
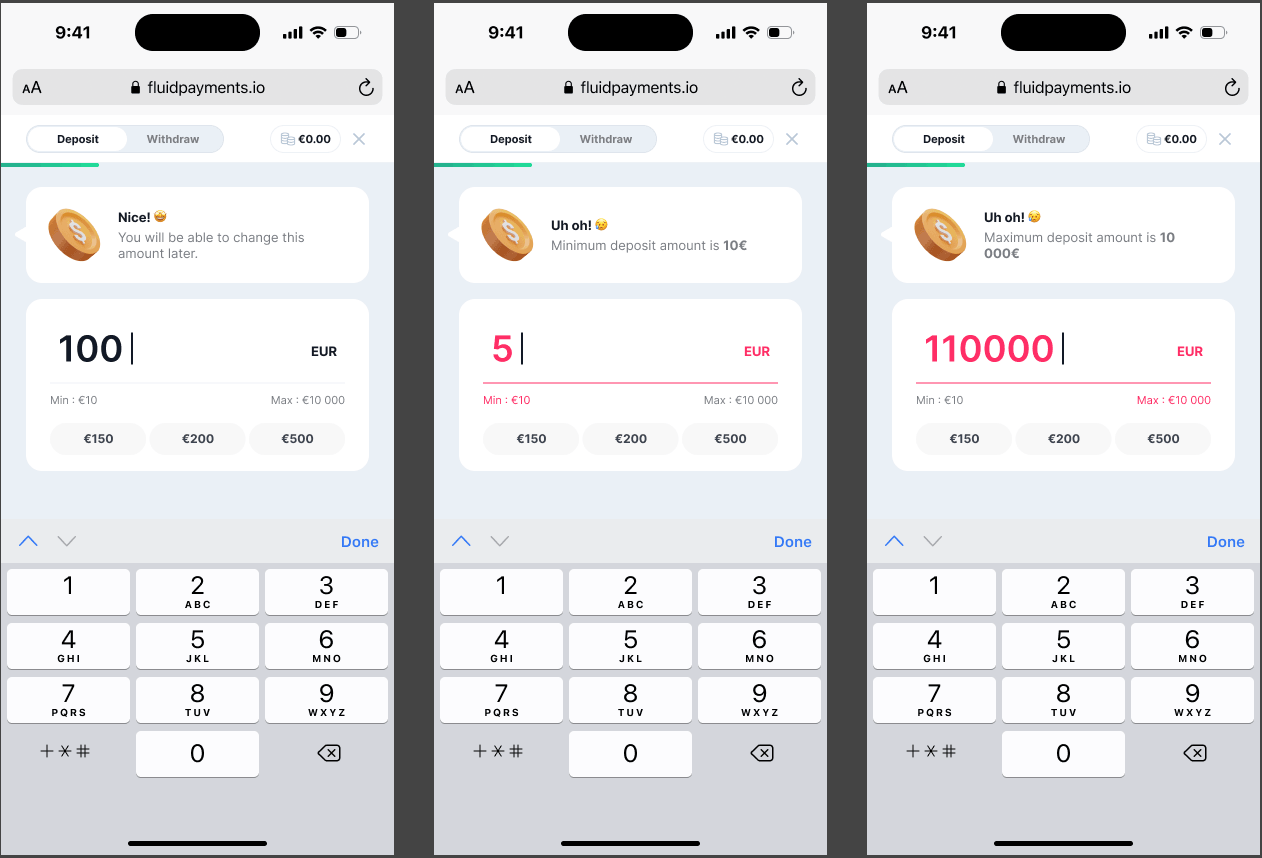
As displayed in the wallet when enabled:
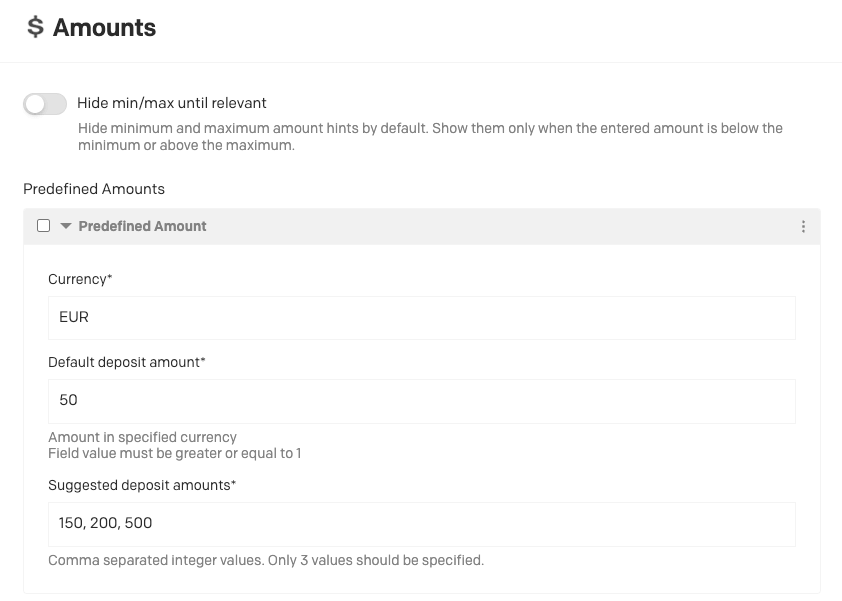
Predefined Amounts
Amounts can be predefined and managed for different currencies, as well as suggest alternative options for customers.
To start using Predefined amounts, click on “New Predefined Amount” and fill in the:
- Currency: Specify the currency for which the predefined amounts apply.
- Default Deposit Amount: Set the default amount to be shown to the customer.
- Suggested Deposit Amounts: Provide additional amounts as alternative options for the customer.
Example:
As set in the back office:
As displayed in the wallet:

Payments
Here, you can configure settings related to transaction fees and autofill options. Additionally, you can manage API credentials for the Admin API.
Player Fees Hidden
When customers are on the Payment Method Selection or Summary screens, transaction fees are displayed, if applicable. By enabling the “Player Fees Hidden” toggle:
- Fees will be hidden from customers.
- The “Countries with Hidden Fees” field will become available.
By default, fees are hidden for all markets. If your brand operates in multiple markets, you can specify which countries to hide fees for by listing their 3-letter Alpha-3 codes, separated by commas.
Autofill Credit Card Name
If a fullname property is being passed in the Data User Object, you have the ability to pre-populate the “Name on Card” field in the card details step by enabling the “Autofill Credit Card Name”.
Card Holder Name Validation (Regex)
You can set the desired validation for the input in the “Name on Card” field.
Admin API Client ID & Admin API Client Secret
These credentials are required for the PaymentIQ admin API.
The credentials will be used for Data Correction and Data Monitoring, which will be used to generate reports.
Display Full List of Deposit Methods
A first time depositor will see 3 payment methods in addition to an expandable view for additional payment methods. If you switch this toggle on, a first time depositor will be shown the full list of available payment methods.
KYC
Fluid also has the ability to provide restrictions and possible actions according to the customer’s KYC (Know your customer) status. This can be enabled by switching the toggle on.
Click here to learn more about the KYC feature.
Visual Configuration
Balance Displayed
Within the wallet, the customer’s balance is shown in the header. This feature can be disabled by switching the toggle off.
Transaction Toggle Displayed
The wallet includes a toggle feature in the header, allowing customers to switch between payment types: Deposit and Withdrawal.
This toggle can be disabled if not required by setting the toggle option to "off."
Bonus Outline
Add an outline to the bonus component when a bonus is selected for improved visibility.
Express Deposit Flow
The Express Deposit Flow is a streamlined deposit experience for first-time depositors (users without saved payment methods). When enabled, the customer sees the amount input, payment method selection, and bonus selection on a single screen, then proceeds directly to the payment details step — skipping the separate bonus and method selection steps.
By default, first-time depositors go through a multi-step flow:
- Amount
- Bonus
- Payment method
- Details
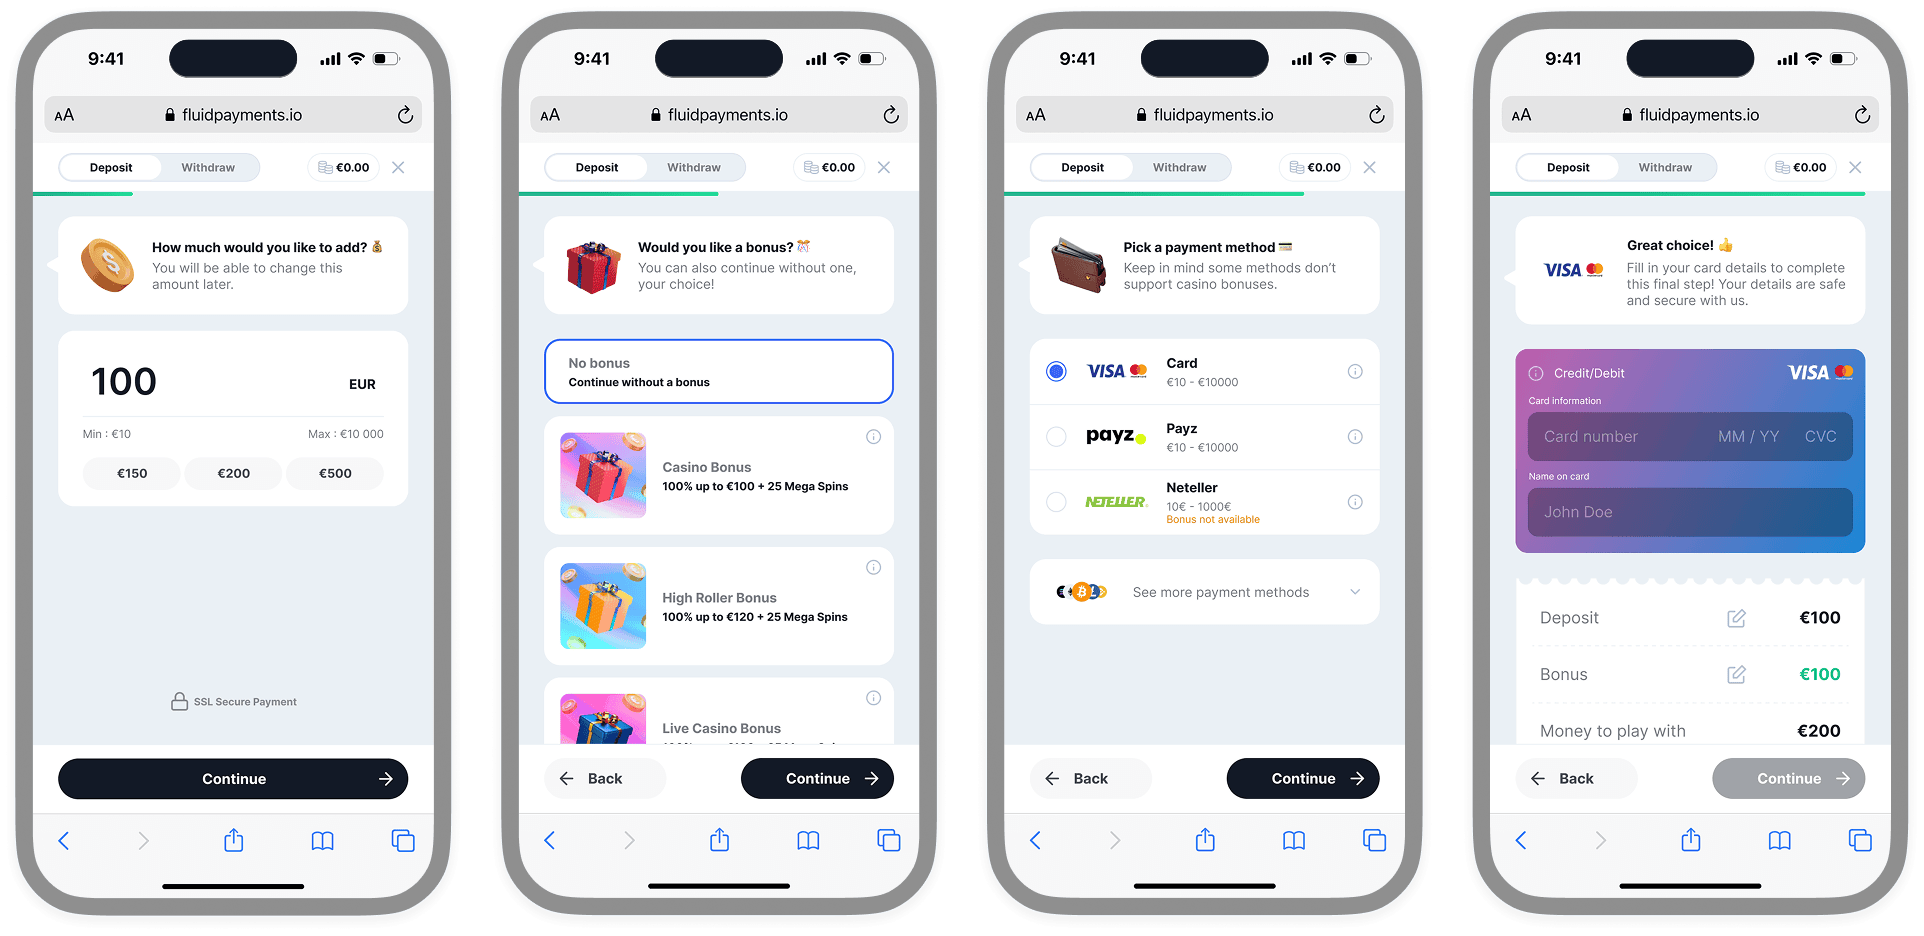
Standard Flow on step 1: amount input only. The customer then proceeds through bonus, payment method, and details on subsequent steps.
With Express Deposit Flow enabled, this becomes:
- Amount + payment method + bonus (combined)
- Details
Express Flow on step 1: amount input, payment method selection, and bonus selection combined on a single screen.
This feature does not affect users with stored payment methods — they continue to use their existing flow.
How to Set Up
- Enable or Disable the feature by switching On/Off the "Express Flow ⚡" toggle.
- Specify which markets should use the Express Flow by listing their 3-letter Alpha-3 codes in the "Countries with Express Flow" field, separated by commas.
- Example:
GBR, DEU, FRA - If the toggle is on but no countries are listed, the Express Flow is enabled for everyone.
- If the toggle is on and countries are listed, the Express Flow is only enabled for customers whose country is in the list.
- Example:
Wallet Position
The Fluid wallet can be positioned in multiple ways, based on your preference and UI requirements. The available options are:
-
Drawer on the Left
- The wallet slides out from the left side of the screen.
- It occupies the left side of the window.
-
Centered
- The wallet slides out from the bottom of the window.
- It occupies the center of the screen.
-
Drawer on the Right
- The wallet slides out from the right side of the screen.
- It occupies the right side of the window.
For these drawer-style positions, an inline style is added to the body tag to prevent scrolling:
style="overflow: hidden; touch-action: none;"
-
Embedded within as inline elements
In this configuration, the wallet is embedded within a container element.
Key Characteristics:
- No Animation: Animations for this position must be applied to the parent element if required.
- No Close Button: The close button is removed from the header.
- No Inline Style: The
bodytag is not modified with inline styles.
Container and Wrapper Guidelines:
- The wallet occupies 100% of its container using the following styles:
inline-size: 100%;
block-size: 100%;
- To control the dimensions of the wallet, define the inline-size or block-size properties on the wrapper (parent element).
- Scrolling is handled inside the wallet, so there is no need to set an overflow property on the wrapper.
Responsive Design Recommendations
- Small Devices
- Use absolute positioning for the wrapper to ensure it covers the entire viewport.
- Minimum width: 320px.
- Tablet Layout
- Activated at 480px.
- The wrapper should have either an inline-size or block-size defined.
- Maximum Size
- The maximum inline size (max-inline-size) for the wrapper is 439px.
- Larger wrappers are unnecessary.
.wrapper-widget {
    position: fixed;
    inset: 0;

    @media only screen and (min-width: 480px) {
        block-size: 600px; // Or 100vh
        inline-size: 440px;
        position: relative;

    }
}
Scroll behavior
By default, the wallet uses the CSS property overscroll-behavior: contain, so that scrolling is kept in the wallet.
If scrolling past the wallet limits is required, you can enable, you can enable overscroll-behavior-auto.
Delay to Waiting Approval (Hours)
When a customer opens their wallet, Fluid retrieves all pending withdrawals that have not yet been processed by the provider. These withdrawals are displayed to the customer, each accompanied by a progress bar reflecting the transaction's status. Additionally, customers are provided the option to "Cancel Withdrawal."
The withdrawal progress bar is a visual indicator designed to enhance user experience by showing the status of a withdrawal request. This feature tracks the progress of a withdrawal request through three stages and updates automatically based on the time elapsed since the request was initiated.
Progress Bar Stages
The progress bar consists of three sequential stages:
- Requested: The withdrawal request has been submitted by the customer.
- Processing: The withdrawal is in the process of being handled.
- Approved: The withdrawal has been approved by the provider. However this will never be shown to the customer, as transactions that have already been processed would not be retrieved.
Setting Up the Delay to "Processing"
You can configure the delay before a withdrawal transitions to the Processing state by specifying the number of hours in the Delay to Waiting Approval field. This field defines the time threshold for moving a withdrawal from the Requested state to Processing if the withdrawal has not yet been processed by the provider.
Steps to Configure:
- Navigate to the Delay to Waiting Approval (Hours) input field.
- Enter the desired number of hours that must elapse before a withdrawal transitions to the "Processing" state.
How it works
- When a customer initiates a withdrawal, it immediately enters the Requested state.
- If the customer reopens their wallet and the provider has not yet processed the withdrawal:
- The progress bar will display the Processing state if the specified delay threshold (hours) has been exceeded. Otherwise, the state will remain on Requested.
Example Workflow
- A customer requests a withdrawal at 10:00 AM.
- The Delay to Waiting Approval is set to 2 hours.
- At 12:01 PM, if the wallet is reopened and the withdrawal is still unprocessed, the progress bar transitions to Processing.
Notes
- The progress bar is a visual feature to provide clarity on the withdrawal status but does not affect the underlying transaction process.
- Customers can cancel their withdrawal at any time before it is approved by the provider.
Contact and Reports
Send Reports
Fluid offers the capability to receive daily BIN reports conveniently via email. These reports are automatically sent every day at 05:00 AM GMT.
How to Enable Daily Reports
To enable this feature, simply toggle the reporting option to "On" in the settings.
Reporting Email
- Specify the email address where the reports should be delivered.
- Multiple recipients can be added. Each email address should be separated by a comma.
Contact Support Link
When a transaction is unsuccessful, operators can provide users with a convenient way to get in touch by displaying a "Contact Us" button. Clicking this button Fluid will send a notification to the Operator and can open the user’s default email application with the recipient’s email address pre-filled.
How to Setup
- Enable or Disable feature by switching On/Off the toggle "Contact Support enabled".
- If the "Contact Support link (optional)" is left blank, the button will have no action bound to it and Fluid will only send a notification to the operator.
- To enable the “Contact Us” button to start an email contact, populate the "Contact Support link (optional)" field.
- Use the “mailto:” tag, followed with the email address for the desired point of contact.
- Example: mailto:support@test.com
- Use the “mailto:” tag, followed with the email address for the desired point of contact.
Pending Withdrawals Reminder
By default, when a user attempts to deposit while having 1 (or more) pending withdrawals, Fluid will show a message to the player advising that they have pending withdrawals and give the option to cancel any pending withdrawal. However, this prompt can simply be ignored and the user can continue with their deposit.
Enabling this feature will allow you to enforce user interaction with this prompt, so that it cannot be ignored. Should the feature be enabled, the user will have to:
- Dismiss the prompt and continue with their deposit, or;
- Cancel any pending withdrawal(s).
- Continue with the deposit flow or dismiss the cashier.
How to Setup
- Enable or Disable the feature by switching On/Off the toggle "User response required for pending withdrawals".
- Define the number of pending withdrawals needed before enforcing interaction with the prompt in the "Pending withdrawals threshold for user response" input field.
Additional Notes
Save Changes: Always click “Save” after making edits to ensure updates are applied.